Kamis, 13 Desember 2012

Kesalahan Umum yang Sering Dilakukan Programmer

» Kesalahan Umum yang Sering Dilakukan Programmer
"Om Swastiastu"


Untuk menjadi seorang programmer, diperlukan proses pematangan yang memakan waktu cukup lama. Kita semua tidak bisa langsung saja menjadi programmer yang matang. Saya sendiri telah melalui beberapa proses tersebut. Ketika membandingkan diri saya dengan saya setahun yang lalu dengan yang sekarang, rasanya banyak sekali hal yang telah saya pelajari. Saya yang tidak tahu apa-apa tentang Web Programming sekarang tiba-tiba saja sudah menguasainya. Walau masih banyak hal yang mesti saya pelajari.

Nah, selama setahun ini saya sudah mempunyai sedikit banyak pengalaman dalam sebuah proyek atau lebih. Dari proyek ke proyek ilmu yang saya dapatkan semakin banyak. Pengalaman juga bertambah, kecepatan saya menganalisa masalah semakin terasah. Tetapi sebagai seorang manusia biasa, kadang saya masih melakukan kesalahan-kesalahan kecil.


Berikut adalah beberapa kesalahan kecil umum yang sering dilakukan seorang programmer.

  • Lupa memberikan tanda titik koma atau semi colon ( ; ) diakhir kode.
    • Setiap mengetikkan perintah pada suatu baris, maka diakhir baris tersebut kita harus mengetikkan tanda titik koma atau semi colon tersebut. Hampir setiap bahasa pemrograman pasti membutuhkan tanda titik koma diakhir setiap barisnya, dan kita sebagai programmer kadang-kadang lupa untuk memberikannya.
  • Tidak memberikan tanda kurung kurawal tutup ( } ).
    • Ketika kalian membuat suatu kondisi menggunakan if atau membuat sebuah fungsi atau class, maka kita perlu membuat kurung kurawal buka dan kurung kurawal tutup. Ini sangat penting untuk mengetahui sampai mana saja isi dari sebuah fungsi, class atau suatu kondisi tersebut.
  • Query SQL yang kurang tepat.
    • Query dalam SQL tentu sangat penting ketika kita membuat sebuah program yang menggunakan database. Terkadang kita lalai sehingga query yang kita buat tidak tepat. Dan menghasilkan jumlah data yang tidak kita inginkan.
  • Tidak memberikan tag penutup pada kode HTML.
    • Dalam web programming, ada kode HTML yang memerlukan tag penutup dan ada juga yang tidak memerlukannya. Kadang ketika mebuat tag div kita lupa untuk memberikan tag penutupnya, sehingga halaman web yang dihasilkan tidak sesuai dengan harapan kita.
Saya kita masih banyak lagi kesalahan-kesalahan kecil yang dilakukan seorang programmer. Waktu pertama kali belajar, entah berapa kesalahan yang sudah saya buat sampai akhirnya saya bisa menjadi seperti sekarang. Ingat programmer juga manusia biasa, tidak luput dari kesalahan, asal kita mau belajar dari kesalahan yang telah kita buat, maka kelak kita akan menjadi seorang programmer yang terampil. Tanpa kesalahan atau kegagalan, kalian tidak akan mungkin bisa menjadi programmer yang terampil dan handal. Semoga anda semua sukses selalu.

pemrograman C++


Halo kawan-kawan semua, ada yang ingin belajar bahasa pemrograman C++? Blog ini berisi banyak artikel serta contoh syntax program dalam pemrograman C++. Semuanya dikemas dalam bentuk scroll bar yang dapat Anda lihat sebelah kanan bagian blog ini. Blog ini memberikan ilmu dasar sampai tahap menengah pemrograman C++. Anda dapat memulainya dengan mendownload compiler C++ yang sudah saya berikan download linknya, yaitu Borland C++, dan Visual C++ 2005. Setelah diberikan compiler yang mana merupakan syarat utama dalam mempelajari bahasa pemrograman C++, kalian juga akan diberikan materi dari dasar beserta contoh syntax programnya. Sehingga diharapkan kalian bisa memahami dasar pemrograman C++ dan dapat menerapkannya menjadi pada kehidupan sehari-hari.

Pada artikel kali ini, saya tidak akan memberikan contoh syntax program C++ atau materi. Saya hanya ingin mendeskripsikan fungsi dan guna blog ini saya buat. Berbagi ilmu pemrograman kepada dunia. Saya harap apa yang saya berikan kepada kalian dalam blog ini dapat bermanfaat dalam menambah wawasan kalian. Saya sendiri masih seorang mahasiswa di salah satu PTS Bali. Saya juga belum menguasai betul pemrograman C++, disini saya hanya membagi ilmu yang sudah saya mengerti atau paling tidak saya mengerti konteks materi tersebut. Jadi mohon maaf apabila ada kesalahan syntax dan sejenisnya. Tapi, tentu saja saya tidak memberikan ilmu tanpa dicoba terlebih dahulu. Apa yang saya posting disini tentu sudah dicoba sebelumnya untuk menghindari kesalahan syntax. Selain C++, saya juga memberikan tutorial SQL. Dan rencana kedepannya, saya akan memberikan tutorial Java dan Visual Basic 2008. Mudah-mudahan lebih banyak bahasa pemrograman lainnya yang bisa saya berikan. Sekian untuk artikel kali ini. Terimakasih ^_^

Getting Set Up - C++ Compilers


Hal pertama yang perlu Anda lakukan, sebelum memulai di C + +, adalah untuk memastikan bahwa Anda memiliki sebuah kompiler. Apa compiler, Anda bertanya? Sebuah compiler mengubah program yang Anda tulis ke sebuah executable bahwa komputer Anda benar-benar dapat memahami dan menjalankan. Jika Anda mengambil kursus, Anda mungkin memiliki satu diberikan melalui sekolah Anda. Jika Anda mulai keluar pada Anda sendiri, Anda terbaik adalah dengan menggunakan Code:: Blocks dengan MinGW. Jika Anda di Linux, Anda dapat menggunakan g + +, dan jika Anda pada Mac OS X, Anda dapat menggunakan Xcode

Tutorial Visual C++


Berikut ini adalah kumpulan tutorial C++ yang bisa anda download dan pelajari. Dari BAB 1 – Habis. Silakan didownload untuk mempelajarinya.
Berikut ini adalah link dan penjelasannya:
Chapter I – II.C/C++ introduction, OOP (object oriented programming), C++ compiler, Hello Worlds…, main(), statements, header file, clearing the screen, writing comments. [download]
Chapter III
C++ basic elements: identifier, data types, variable declaration, const, assignment. [download]
Chapter IV-V
Operator, statement, input, output [download]
Chapter VI
Control statements: IF, SWITCH, FOR, WHILE, DO WHILE [download]
Chapter VII-VIII
Functions, String [download]
Chapter IX-X
Array, Struktur [download]
Chapter XI
Materi: Operasi File [download]
Chapter XII
Class [download]

Using Frames (I)

We are going to see what Frames are and when they must be used. We will also see how to insert a simple frame into a website and how to work with it.

Introduction
 
Frames are used to distribute the data in a web site. They help to keep some parts straight such as they are, as the logotype and the browser bar, while the others can change.
In addition they usually improve the appearance.
Each page's frame has its own HTML file. For example, in the image on the right you can see a page with two frames. The left frame has the menu.htm file, and the right frame has the dogs.htm file.
To see the page this way, we have opened the browser's file frames.htm, which is the page that has grouped the frames.
It is possible to edit the frame's files from the page that containts the set of frames. This simplifies the work as it is easier to figure what the final page is going to look like.
This is something that you cannot do if you edit each framed file individualy.
Working with frames can be a bit complicated, and even more so in the begining. We are not going to go too much into the theme, and we will only look at some of the basic concepts with a few easy examples.

Creating frames
There are many ways of creating a frame. We will only learn one.
To create a frame, you first need to open a file. It can be new or an existing one.
After this, you need to go to the Insert menu, HTML, and Frames. Through this option you can select the type of frame you want to create.
We are going to look at the Left frame option.
If we click on Left, a new frame will be created in the left side of the current file.


As you can see in the image, there is a line splitting the document.
In this case we will have three files: the left one, the right one, and the one which has the set of frames. The right one is the file we had at the start. It is in the frame known as Main Frame.
To select the file that has the set of frames you have to click on the line that splits the frames. This is only possible in case of not having been previously saved.

In case of inserting a right frame instead of a left frame, the empty frame will be shown to the right of the original file.
In this image you can see an example of a right frame.
A right frame has been inserted over an existing file, menu.htm.
As in the previous case, we have three files: the left, the right, and the one which has the set of frames. In this case the file we had at the begining is the left one, while the previous was the right one. For this reason Main frame will be at the left.
Main frame is the frame that is always in the initial file, into which the rest of the frames have been inserted.

Setting Up Your Website in Dreamweaver


Start up Dreamweaver.
Picture of Dreamweaver CS3 at startup You will be greeted with a window with a top-half looks something like the picture above (without the words "Dreamweaver Tutorial thesitewizard.com" of course). Your picture may be slightly different depending on whether you are using Mac OS X, Windows XP or Windows Vista.
If you look at the top part of the window, you will see a menu bar that reads "File Edit View Insert Modify Text Commands Site Window Help". We will be accessing a lot of Dreamweaver's features via this menu bar.
The first thing you will need to do is to define your site in Dreamweaver's Site Manager. Click the "Site" menu item on the menu bar. A drop-down menu will appear. Click the "New Site..." item in the menu bar.
Important note: in the interest of brevity, in the future, I shall refer to the sequence of clicking the "Site" menu, followed by clicking on the "New Site..." item simply as "Site | New Site..."
A dialog box will appear with words to the effect "Site Definition for Unnamed Site 1". The number that follows the word "Site" may be different if you have ever used Dreamweaver to set up a site before. Don't worry about that. We are about to change it anyway.
At the top of the dialog box is the "Basic" tab. If it is not currently selected, click on it to select it. If you're not sure, just click on it.
In the edit box for "What would you like to name your site?", type in the name you wish to give to your site. If you are not sure what name you want for your site, use your domain name. For example, if you have purchased a domain called "example.com", put "example.com" (without the quotes) into the box. For the purpose of this tutorial, I will assume that you have typed "Example Company" in the box.
Once you have done the above, enter the web address of your site in the box following the question "What is the HTTP Address (URL) of your site?". For example, if you bought the domain "example.com", your website address will be "http://www.example.com/" (without the quotes), unless your web host tells you otherwise.
Click the "Next" button at the bottom of the window to proceed to the next screen.
Accept the default "No, I do not want to use a server technology" for now. Click the "Next" button again.
The next screen allows you to define where Dreamweaver saves the files you create. The default is to place the files in a folder with the same name as your website. You can change the location if you wish. Note that this folder merely determines where on your computer the website files are saved. You will be taught how to publish those files to your web host in a later step. It is always good practice to keep a copy of your website on your own computer. If you don't know what to do here, just accept the default.
When you click "Next", you will be asked "How do you connect to your remote server?". For now, select "None" in the drop-down box and click "Next" again. You will then be given a "Site Definition" summary. Click "Done".

Creating a Simple Two-Column Web Page with Header and Footer

You will now create the main page of your website. For the purpose of this tutorial, we will be creating a two-column web page for the main page. A two-column web page basically means that the page will have two vertical columns. Websites typically use one of the columns to hold the website's logo and navigation buttons and the other column to hold the main content. For example, on thesitewizard.com's article pages, such as the one you are reading now, the left column holds the navigation menu while the right column holds the article text.
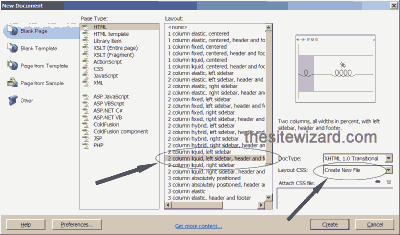
Click "File | New". That is, click the "File" menu followed by the "New" item on the menu that appears. A new window entitled "New Document" will appear.
Picture of New Document window in Dreamweaver Look in the "Layout" column in the window that appears and locate the item "2 column liquid, left sidebar, header and footer". Select the item by clicking on it once.
Look at the rightmost side of the same window and locate the item "Layout CSS". Click the drop-down box and select "Create New File". This will cause Dreamweaver to save certain types of information about the appearance of the web page (called CSS) in a separate file. One of the ways in which this is useful is that when we design other pages of the site, we can reuse the same information by simply loading it from the same file.
Click the "Create" button.
A dialog box entitled "Save Style Sheet As" appears. Accept the default name and location by simply clicking the "Save" button.
Dreamweaver now presents you with a page with two columns with some dummy content typed in. We will be replacing some of the dummy content with our own content.

Designing the Home Page: Preamble

The page you are about to design will serve as the website's "Home Page", which means that it is the main page of your website. It is the page that visitors will see if they type your website's address without specifying any page name. For example, if your domain is called "example.com", and your visitor types "http://www.example.com", they will see this page.
A home page typically contains brief information about what the site is about as well as links to the other pages of your website. If this is the home page of your personal site, you will probably want to welcome your visitors and mention briefly what they can hope to see on your site. If this is the home page of a company site, it will typically mention briefly what the company sells, it's main products and point the visitors to individual product pages or other pages on your site.
For the purpose of this tutorial, I will provide example text for a fictitious company called "Example Company", selling some fictitious products. You should of course use your own text rather than my supplied text. For example, if your company is called XYZ Inc, go ahead and use "XYZ Inc" in places where I use "Example Company". Likewise if you are creating a personal website, and you are out of ideas as to what to call your site, call it by your name. For example, if your name is Shakespeare, call it Shakespeare's Website.

Dreamweaver CS3

  1. Dreamweaver CS3

    You will need Dreamweaver CS3 (obviously). The tutorial assumes that you are using Dreamweaver CS3. There are versions of Dreamweaver for both Windows and Mac OS X — either version will do fine. For the most part, both versions work in the same way.
    Note: if you are using Dreamweaver CS4, please see my other tutorial series Dreamweaver CS4 Tutorial instead. The latter was written specifically for that version of Dreamweaver, and takes advantage of some of its newer features. Likewise, Dreamweaver CS5.5 users should read the Dreamweaver CS5.5 Tutorial and Dreamweaver CS5 users the Dreamweaver CS5 Tutorial.
  2. A Web Hosting Account

    You will need a web host to publish your pages to. For the complete beginner, a web host is (loosely speaking) a company which has computers that are permanently connected to the Internet. After you design your web page(s), you will need to transfer your pages to your web host's computer (called a web server), so that the rest of the world can see it. There are numerous web hosts around — you can find a list of cheap web hosts on http://www.thefreecountry.com/webhosting/budget1.shtml
There are other things involved in getting your first web site up and running, such as getting your own domain name, making your website search engine friendly and promoting your web site. This tutorial however does not deal with those matters — it is strictly about designing (creating) and publishing (uploading) your website using Dreamweaver. If you are a total beginner, you may want to consult my article How to Start / Create Your Own Website: The Beginner's A-Z Guide for an overview of the entire process and all the things you will need.

Overall Goals of the Dreamweaver Tutorial

By the end of this tutorial, you will have set up a working website with multiple pages, including a main page, a feedback form, an About Us page, and a Site Map. Your pages will contain a sophisticated navigation menu bar, images, multiple columns, a form, links to other pages within your site, links to other sites, text in different font sizes, etc. In other words, you will have a fully functional website.
More importantly, you will know how to use Dreamweaver to create, design and publish your site so that you can design new sites any time you want.